
Get a better intelligent performance at home with this trick
There are several excellent features offered by Nest Wifi and Nest Wifi Pro from Google, but one of our favorites is the ability to prioritize devices.
While being able to share your Wi-Fi password and try the performance of your Wi-Fi network is relatively simple to find Google Home application, the ability to prioritize devices is a bit more hidden.
There are some warnings to prioritize a device on your Wi-Fi, predominantly that other devices may not work as well as the one you have chosen to obtain all the Wi-Fi juice, but it is perfect for those moments when you have an important video call, or really want to see the last season of your favorite program in Netflix without the red wheel of Doom.
With that in mind, here is a summary of how the devices on Nest Wifi and Nest Wifi Pro.
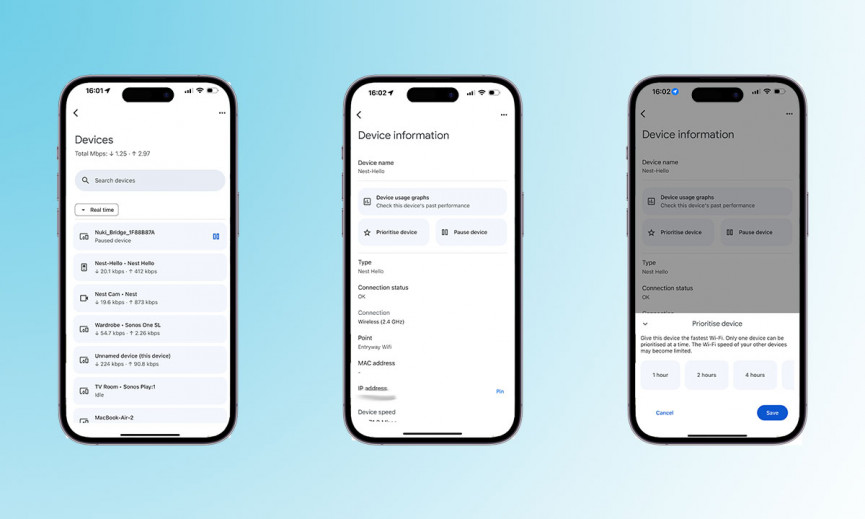
How to prioritize devices on Nest Wifi
If you want to make sure your laptop has priority in your Wi -Fi Nest, or maybe your door videos when you are away, follow our steps below and guide it through a device on your Nest Wif or Nest Wifi Proi device.
- Open Google at homeapplication on your phone or tablet.
- Open the Favorite tab at the bottom.
- Touch the Wi-Fi icon In the upper bar.
- Select the Device icon That presents all the devices connected to your network within it.
- Choose the device You want to prioritize from the list.
- Leverage Prioritize the device For the favorite of the respective device you have chosen.
- Choose the time You want to prioritize your device. You can select between 1 hour, 2 hours, 4 hours and 8 hours.
- Press Save.
Unfortunately, you can only select a device to prioritize at the same time, so, although it is ideal for those moments in which you are playing and you want to prioritize your console, or if you want to make sure that your outdoor security cameras are not lost a rhythm, it is not recommended to prioritize a particular device all the time if you want to ensure a decent experience in all devices.
Nest Wifi is intelligent enough so that, by default, you must offer good coverage automatically on all its intelligent starting devices and any other device you have in your home thanks to the fact that it is a mesh network. However, there are times when you only need the approach to be in a specific device, and that is where this prioritization feature is useful.

Other Wi -Fi nest tips that are useful to know
There are many other features offered by Nest Wifi and Nest Wifi Pro that could be useful. Some of our favorites are underneath.
Create a guest network
Creating a network of guests on Nest Wifi allows anyone who visits their home to connect to their network without needing to give them the main details of their main network and password.
Open the Google Home application> Select the Wi-Fi tab> Family Wi-Fi Choose> Follow the instructions to configure it.
Test your network speed
If you have problems transmission on your TV or your intelligent start centers do not connect, it is a good idea to consult your network to see if your internet is reproducing, or the service or device.
Open the Google Home application> Select the Wi-Fi> Network test.
Share your Wi-Fi password
If you do not want to create a network of guests on your Nest Wifi, but you are happy to share your main password, you can do it using a QR code.
Open the Google Home application> Select the Wi-Fi tab> Share password. You can make your guest scan the QR code on your phone, or you can choose to copy the password, read it, send it to them or send it by email.


